• 3493阅读
  • 1回复

Qml特效14-跟上节奏 [复制链接]

上一主题 下一主题
离线dd759378563
 

图酷模式  只看楼主 正序阅读 楼主  发表于: 2019-06-11
Qml特效14-跟上节奏
作者 涛哥
目录ShaderEffect跟上节奏 效果源码

简介

这是《Qml特效》系列文章的第14篇,涛哥将会教大家一些Qml特效和动画相关的知识。
前12篇是进场动画效果 参考了WPS版ppt的动画,12种基本效果已经全部实现,可以到github TaoQuick项目中预览:
进场动画预览
因为效果都比较简单,就没有写太多说明。
没有13
没有13
没有13
从14篇开始,做一些特殊的效果和动画,同时会讲解相关的知识。


关于文章

文章主要发布在涛哥的博客涛哥的知乎专栏-Qt进阶之路


跟上节奏 效果预览

跳动的字节,以及倒影

其中用到的知识点有: Qml动态创建组件、Qml随机数生成、Qml给Item拍照(layer属性)、Qml翻转。
当然还有一些预备知识:
做特效和动画,要用到QtQuick的动画系统,以及ShaderEffect特效。


QtQuick动画系统


动画组件

Qt动画系统,在帮助文档有详细的介绍,搜索关键词”Animation”,涛哥在这里说一些重点。
涛哥用思维导图列出了Qml中所有的动画组件:


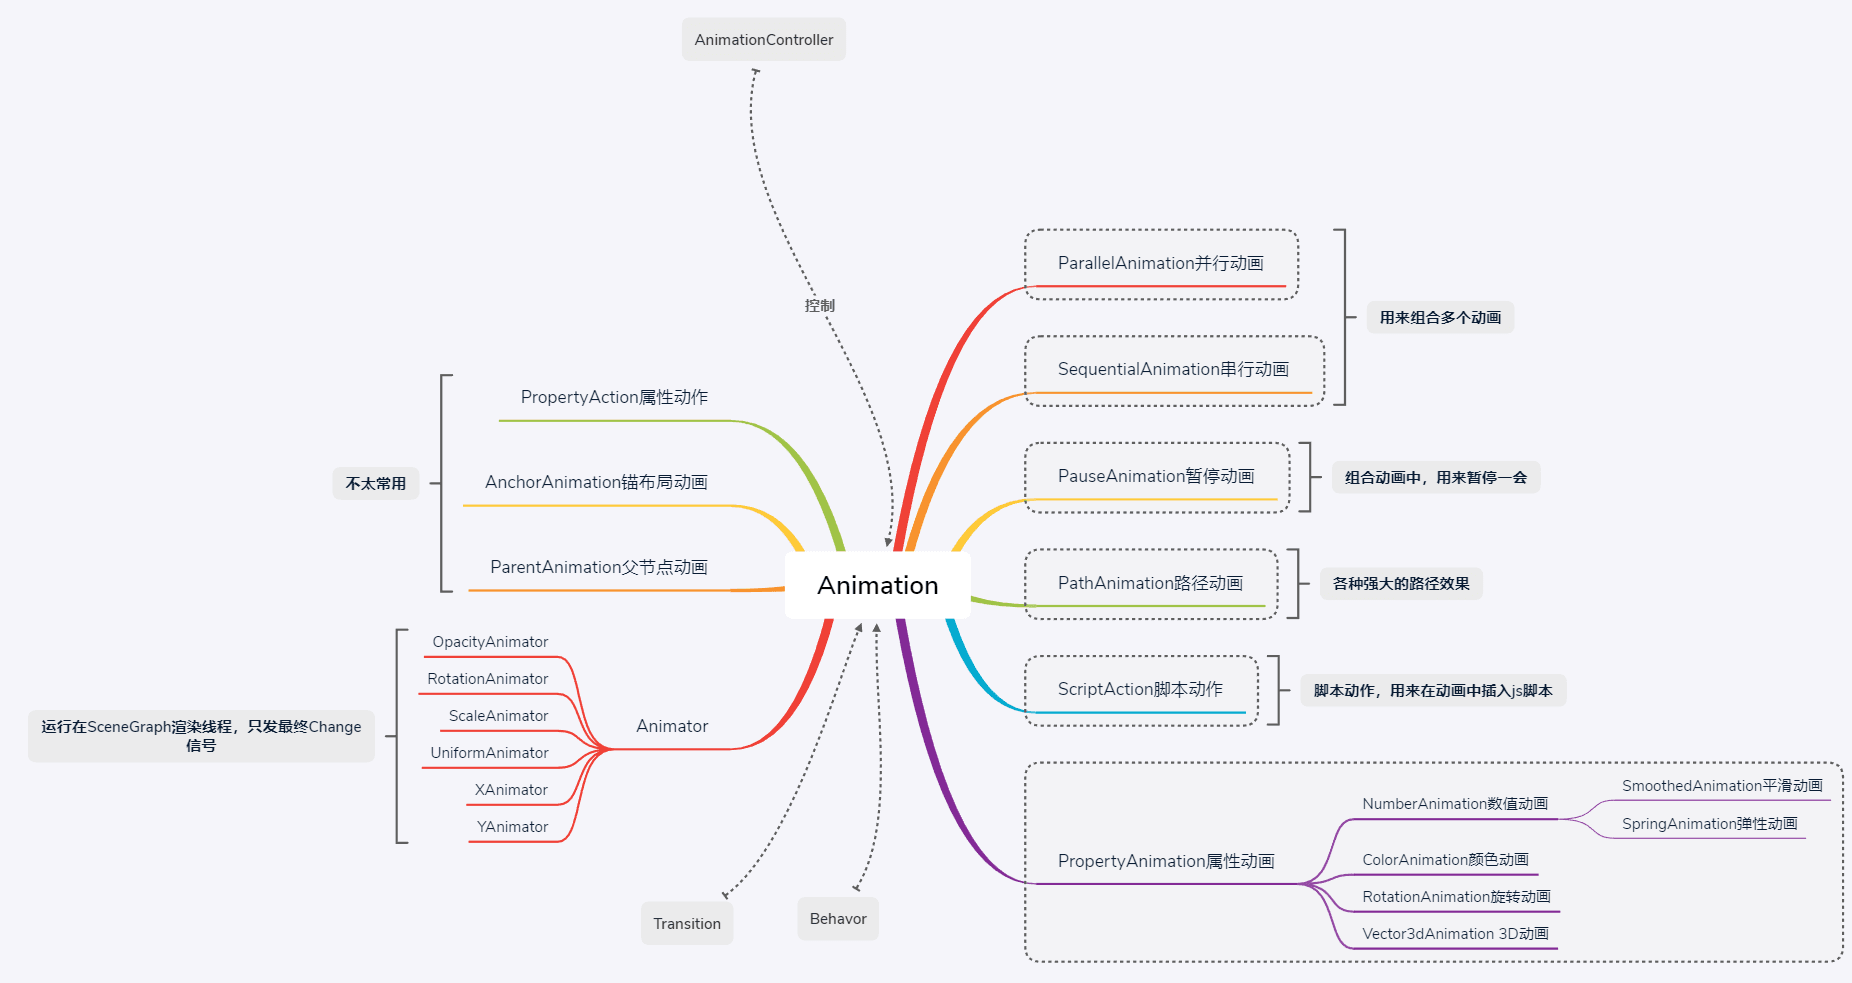
  • 右边带虚线框的部分比较常用,是做动画必须要掌握的,尤其是属性动画PropertyAnimation和数值动画NumberAinmation。
    常见的各种坐标动画、宽高动画、透明度动画、颜色动画等等,都可以用这些组件来实现。

  • 底下的States、Behavior 和 Traisitions,也是比较常用的和动画相关的组件。可在帮助文档搜索
    关键词”Qt Quick States”、”Behavior”、”Animation and Transitions”。后续的文章,涛哥会专门讲解。

  • 左边的Animator系列,属于Scene Graph渲染层面的优化,其属性Change信号只在最终值时发出,不发出中间值,使用的时候需要注意。

  • 顶上的AnimationController,属于高端玩家,用来控制整个动画的进度。


动画的使用


用例一 直接声明动画

直接声明动画,指定target和property,之后可以在槽函数/js脚本中通过id控制动画的运行。
也可以通过设定loops 和 running属性来控制动画
1
2
3
4
5
6
7
8
9
10
11
12
13
14
15
16
17
18
19
20
21
22
23
24
25
26
Rectangle {
    id: flashingblob
    width: 75; height: 75
    color: "blue"
    opacity: 1.0

    MouseArea {
        anchors.fill: parent
        onClicked: {
            animateColor.start()
            animateOpacity.start()
        }
    }

    PropertyAnimation {id: animateColor; target: flashingblob; properties: "color"; to: "green"; duration: 100}

    NumberAnimation {
        id: animateOpacity
        target: flashingblob
        properties: "opacity"
        from: 0.99
        to: 1.0
        loops: Animation.Infinite
        easing {type: Easing.OutBack; overshoot: 500}
   }
}


用例二 on语法

on语法可以使用动画组件,也可以用Behavior,直接on某个特定的属性即可。效果一样。
on动画中,如果直接指定了running属性,默认就会执行这个动画。
也可以不指定running属性,其它地方修改这个属性时,会自动按照动画来执行。
示例代码 on动画
1
2
3
4
5
6
7
8
9
Rectangle {
    width: 100; height: 100; color: "green"
    RotationAnimation on rotation {
        loops: Animation.Infinite
        from: 0
        to: 360
        running: true
    }
}
示例代码 Behavior 动画
1
2
3
4
5
6
7
8
9
10
11
12
13
14
15
16
import QtQuick 2.0

Rectangle {
    id: rect
    width: 100; height: 100
    color: "red"

    Behavior on width {
        NumberAnimation { duration: 1000 }
    }

    MouseArea {
        anchors.fill: parent
        onClicked: rect.width = 50
    }
}


用例三 Transitions或状态机

过渡动画和状态机动画,本质还是直接使用动画组件。只不过是把动画声明并存储起来,以在状态切换时使用。
这里先不细说了,后面会有系列文章<Qml特效-页面切换动画>,会专门讲解。


ShaderEffect

动画只能控制组件的属性整体的变化,做特效需要精确到像素。
Qml中提供了ShaderEffect这个组件,就能实现像素级别的操作。
Qml中有一个模块QtGraphicalEffects,提供了部分特效,就是使用ShaderEffect实现的。
使用ShaderEffect实现特效,需要有一些OpenGL/DirectX知识,了解GPU渲染管线,同时也需要一些数学知识。
大名鼎鼎的ShaderToy网站,就是使用Shader实现各种像素级别的酷炫特效。
ShaderToy
作者iq大神
ShaderToy上面的特效都是可以移植到Qml中的。
使用Shader开发,需要一定的图形学知识。其中使用GLSL需要熟悉OpenGL, 使用HLSL需要熟悉DirectX。


跟上节奏 效果源码


组件的封装

封装了一个组件TSoundByte
1
2
3
4
5
6
7
8
9
10
11
12
13
14
15
16
17
18
19
20
21
22
23
24
25
26
27
28
29
30
31
32
33
34
35
36
37
38
39
40
41
42
43
44
45
46
47
48
49
50
51
52
53
54
55
56
57
58
59
60
61
62
63
64
//TSoundByte.qml
import QtQuick 2.12

Item {
    id: r
    implicitWidth: (soundWidth + columnSpacing) * columnCount
    implicitHeight: (soundHeight + rowSpacing) * rowCount
    Component {
        id: soundComp
        Image {
            source: "qrc:/EffectImage/Img/soundRect.png"
            width: soundWidth
            height: soundHeight
        }
    }
    property bool running: true
    property int interval: 320
    property int soundWidth: 12
    property int soundHeight: 6

    property int rowCount: 15
    property int columnCount: 30

    property int rowSpacing: 4
    property int columnSpacing: 4

    property var objPool: []
    property var map:[]
    property int __arrayRatio: 100
    Component.onCompleted: {
        let startX = 0
        let startY = r.height - 12
        for (let i = 0; i < columnCount; ++i) {
            map.push(getRandomInt(0, rowCount))

            let px = startX + i * (soundWidth + columnSpacing)
            for (let j = 0; j < rowCount; ++j) {
                let py =  startY - j * (soundHeight + rowSpacing)

                var obj = soundComp.createObject(r, {"x": px, "y": py, "visible": false})
                objPool[i * __arrayRatio + j] = obj
            }
        }
    }
    Timer {
        interval: r.interval
        running: r.running
        repeat: true
        onTriggered: {
            map.push(getRandomInt(0, rowCount))
            map.shift()
            for (let i = 0; i < columnCount; ++i) {
                for (let j = 0; j < rowCount; ++j) {
                    objPool[i * __arrayRatio + j]["visible"] = j < map ? true : false
                }
            }
        }
    }
    function getRandomInt(min, max) {
      min = Math.ceil(min);
      max = Math.floor(max);
      return Math.floor(Math.random() * (max - min)) + min; //不含最大值,含最小值
    }
}


大致原理

这里的soundComp就是一个Component组件,在槽函数/js函数中,可以用id去动态创建。
soundComp.createObject(r, {“x”: px, “y”: py, “visible”: false})
涛哥一次性创建了n * m 个Component,都设置好相对的坐标,存储到objPool数组中。
visible属性根据预定义的数组map来控制。
之后在定时器中,用一个随机高度去刷新map。然后再更新objPool中的visible即可。


组件的使用

1
2
3
4
5
6
7
8
9
10
11
12
13
14
15
16
17
18
19
20
21
22
23
24
25
26
27
28
29
30
31
32
import QtQuick 2.12
import QtQuick.Controls 2.12
import "../Effects"
Rectangle  {
    anchors.fill: parent
    color: "black"
    TSoundByte {
        id: src
        anchors.centerIn: parent
        anchors.verticalCenterOffset: -100
        interval: 240
    }

    ShaderEffectSource {
        id: mirror
        width: src.width
        height: src.height
        x: src.x
        y: src.y + src.height + 10
        opacity: 0.3
        sourceItem: src
        transform: Rotation {
            origin.x: mirror.width/2
            origin.y: mirror.height/2
            axis.x: 1; axis.y: 0; axis.z: 0
            angle: 180
        }
        //no effect
        //textureMirroring: ShaderEffectSource.MirrorHorizontally

    }
}


倒影效果原理

先是实例化了一个TSoundByte组件,id为src,之后又在实例src的坐标下面,放了一个ShaderEffectSource,指定其sourceItem为src。
这样就有了src的一个复制品mirror。然后把mirror翻转180度,透明度调一下,就变成倒影效果了。

涛哥是个Qml高手,著有《Qml组件化编程》《Qml特效》系列教程,见知乎专栏-Qt进阶之路:https://zhuanlan.zhihu.com/TaoQt
或微信公众号:Qt进阶之路
离线poucc

只看该作者 1楼 发表于: 2019-06-11
涛神,威武。
快速回复
限100 字节
 
上一个 下一个