-
UID:176218
-
- 注册时间2016-10-15
- 最后登录2019-12-19
- 在线时间19小时
-
- 发帖52
- 搜Ta的帖子
- 精华0
- 金钱577
- 威望64
- 贡献值0
- 好评度54
-
访问TA的空间加好友用道具

|
Qml特效1-进场动画-飞入目录(放个目录方便预览。这个目录是从博客复制过来的,点击会跳转到博客)ShaderEffect飞入效果源码 简介 这是《Qml特效-进场动画》系列文章的第一篇,涛哥将会教大家一些Qml进场动画相关的知识。 关于文章 《Qml组件化编程》系列文章,已经发布了10篇,暂时没有更多内容了,后续可能会更新,看情况。涛哥开始了新的系列文章《Qml特效》,计划是三部曲《Qml特效-进场动画》《Qml特效-页面切换动画》《Qml特效-3D特效》,欢迎大家关注。进场动画效果 参考了WPS版ppt的动画,基本效果已经全部实现,可以到github TaoQuick项目中预览:https://github.com/jaredtao/TaoQuick/blob/master/Preview-animation.md
文章主要发布在涛哥的博客 和 涛哥的知乎专栏-Qt进阶之路 进入效果预览 第一篇文章,就放一个简单的进入动画
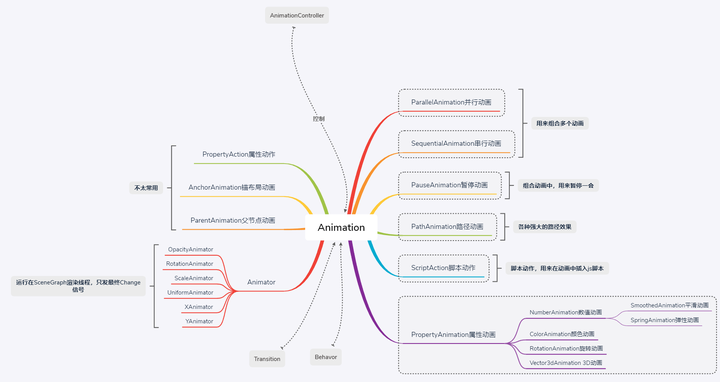
实现原理 进场动画,使用了QtQuick的动画系统,以及ShaderEffect特效。Qml中有一个模块QtGraphicalEffects,提供了部分特效,就是使用ShaderEffect实现的。使用ShaderEffect实现特效,需要有一些OpenGL/DirectX知识,了解GPU渲染管线,同时也需要一些数学知识。 QtQuick动画系统 动画组件 Qt动画系统,在帮助文档有详细的介绍,搜索关键词”Animation”,涛哥在这里说一些重点。涛哥用思维导图列出了Qml中所有的动画组件:

- 右边带虚线框的部分比较常用,是做动画必须要掌握的,尤其是属性动画PropertyAnimation和数值动画NumberAinmation。
常见的各种坐标动画、宽高动画、透明度动画、颜色动画等等,都可以用这些组件来实现。 - 底下的States、Behavior 和 Traisitions,也是比较常用的和动画相关的组件。可在帮助文档搜索
关键词”Qt Quick States”、”Behavior”、”Animation and Transitions”。后续的文章,涛哥会专门讲解。 - 左边的Animator系列,属于Scene Graph渲染层面的优化,其属性Change信号只在最终值时发出,不发出中间值,使用的时候需要注意。
- 顶上的AnimationController,属于高端玩家,用来控制整个动画的进度。
动画的使用 用例一 直接声明动画 直接声明动画,指定target和property,之后可以在槽函数/js脚本中通过id控制动画的运行。也可以通过设定loops 和 running属性来控制动画- Rectangle {
- id: flashingblob
- width: 75; height: 75
- color: "blue"
- opacity: 1.0
- MouseArea {
- anchors.fill: parent
- onClicked: {
- animateColor.start()
- animateOpacity.start()
- }
- }
- PropertyAnimation {id: animateColor; target: flashingblob; properties: "color"; to: "green"; duration: 100}
- NumberAnimation {
- id: animateOpacity
- target: flashingblob
- properties: "opacity"
- from: 0.99
- to: 1.0
- loops: Animation.Infinite
- easing {type: Easing.OutBack; overshoot: 500}
- }
- }
- Rectangle {
- width: 100; height: 100; color: "green"
- RotationAnimation on rotation {
- loops: Animation.Infinite
- from: 0
- to: 360
- running: true
- }
- }
示例代码 Behavior 动画- import QtQuick 2.0
- Rectangle {
- id: rect
- width: 100; height: 100
- color: "red"
- Behavior on width {
- NumberAnimation { duration: 1000 }
- }
- MouseArea {
- anchors.fill: parent
- onClicked: rect.width = 50
- }
- }
用例三 Transitions或状态机 过度动画和状态机动画,本质还是直接使用动画组件。只不过是把动画声明并存储起来,以在状态切换时使用。这里先不细说了,后面会有系列文章<Qml特效-页面切换动画>,会专门讲解。 ShaderEffect 动画只能控制组件的属性整体的变化,做特效需要精确到像素。Qml中提供了ShaderEffect这个组件,就能实现像素级别的操作。大名鼎鼎的ShaderToy网站,就是使用Shader实现各种像素级别的酷炫特效。ShaderToy作者iq大神ShaderToy上面的特效都是可以移植到Qml中的。使用Shader开发,需要一定的图形学知识。其中使用GLSL需要熟悉OpenGL, 使用HLSL需要熟悉DirectX。 进入效果源码 封装了一个平移进入的动画组件,能够支持从四个方向进场。- //ASlowEnter.qml
- import QtQuick 2.12
- import QtQuick.Controls 2.12
- import "../.."
- Item {
- id: r
- property int targetX: 0
- property int targetY: 0
- property alias animation: animation
- enum Direct {
- FromLeft = 0,
- FromRight = 1,
- FromTop = 2,
- FromBottom = 3
- }
- property int dir: ASlowEnter.Direct.FromBottom
- property int duration: 2000
- //额外的距离,组件在父Item之外时,额外移动一点,避免边缘暴露在父Item的边缘
- property int extDistance: 10
- property var __propList: ["x", "x", "y", "y"]
- property var __fromList: [
- -r.parent.width - r.width - extDistance,
- r.parent.width + r.width + extDistance,
- -r.parent.height - r.height - extDistance,
- r.parent.height + r.height + extDistance]
- property var __toList: [targetX, targetX, targetY, targetY]
- NumberAnimation {
- id: animation
- target: r
- property: __propList[dir]
- from: __fromList[dir]
- to: __toList[dir]
- duration: r.duration
- loops: 1
- alwaysRunToEnd: true
- }
- }
进场组件的使用- //Enter.qml
- import QtQuick 2.12
- import QtQuick.Controls 2.12
- import "../Animation/Enter"
- Item {
- anchors.fill: parent
- ASlowEnter {
- id: a1
- width: 160
- height: 108
- x: (parent.width - width) / 2
- targetY: parent.height / 2
- dir: ASlowEnter.Direct.FromBottom
- Image {
- anchors.fill: parent
- source: "qrc:/EffectImage/Img/baby.jpg"
- }
- }
- ASlowEnter {
- id: a2
- width: 160
- height: 108
- x: (parent.width - width) / 2
- targetY: parent.height / 2 - height
- dir: ASlowEnter.Direct.FromTop
- Image {
- anchors.fill: parent
- source: "qrc:/EffectImage/Img/baby.jpg"
- }
- }
- ASlowEnter {
- id: a3
- width: 160
- height: 108
- targetX: parent.width / 2 - width * 1.5
- y: (parent.height - height) / 2
- dir: ASlowEnter.Direct.FromLeft
- Image {
- anchors.fill: parent
- source: "qrc:/EffectImage/Img/baby.jpg"
- }
- }
- ASlowEnter {
- id: a4
- width: 160
- height: 108
- targetX: parent.width / 2 + width / 2
- y: (parent.height - height) / 2
- dir: ASlowEnter.Direct.FromRight
- Image {
- anchors.fill: parent
- source: "qrc:/EffectImage/Img/baby.jpg"
- }
- }
- ParallelAnimation {
- id: ani
- ScriptAction{ script: {a1.animation.restart()} }
- ScriptAction{ script: {a2.animation.restart()} }
- ScriptAction{ script: {a3.animation.restart()} }
- ScriptAction{ script: {a4.animation.restart()} }
- }
- Component.onCompleted: {
- ani.restart()
- }
- Button {
- anchors.right: parent.right
- anchors.bottom: parent.bottom
- text: "replay"
- onClicked: {
- ani.restart()
- }
- }
- }
|